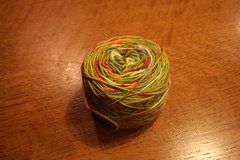
Test Post to see if I can grab the photo for Ravelry.
Tuesday, October 12, 2010
Thursday, June 24, 2010
B is for Brown - Out of the Dye Pot!
Today was a good day for dyeing - fabric that is. I bought some iDye fabric dye with the plan of trying to rescue a pair of pants and a top that had met with unfortunate accidents; one with a leaking bottle of wine and the other with some errant bleach splatters. I decided today would be the day to do it.
Based on the recomendation on the package of dye, I decided to forgo the easier washing machine method and use the stove top method. This was recommended for dark colors such as brown, black or highly saturated colors like red and purple. I filled a roasting pan that I had purchased at a garage sale to be used just for dying with water,

poured in the dye (apparently, as I discovered later, I could have just dropped in the plastic packet of dye powder and it would have dissolved), put in the first item, brought it to a simmer, added a cup of salt, and let it simmer for half an hour, stirring often to make sure the fabric was dyed evenly. I pulled the pants out of the dye bath and added the shirt. There was still plenty of dye left. I only left the shirt in for 15 minutes and it dyed just fine. There was still plenty of color so I decided to throw in some linen napkins I had bought at a second hand store that were an ugly orange color
 as well as a few kitchen towels that were stained and ugly. Once everything
was dyed I threw them all in the washer with detergent and ran them through a short wash. They are now hanging
on the line drying.
Everything I dyed turned out a nice, rich brown. I was very happy with the results. Of course, the thread on the pants was not cotton thread and/or was coated so it did not take the color, but I think the contrasting thread looks pretty cool. The bleach spots on the shirt are still visible if you look really closely, but not noticeable at all from a distance and much better than the original. The linen napkins are now a very pretty shade of brown.


All in all, this
 was a success. It feels good to take items that I would have had to throw away and make them useable again. It's even better that some of the items were actually from a thrift store in the first place.
Dyeing is easy to do and can breathe new life in used items. Try it yourself!
Friday, August 21, 2009
I already love my IPod Touch and I don't even have it yet!
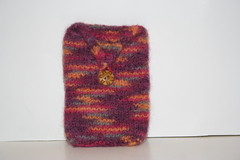
So I will soon be the proud owner of a 32 GB IPod Touch. In anticipation of its delivery I decided I needed to knit it a home - thus the IPod Touch Cozy. Now doesn't every IPod Touch need a wool nest to keep it safe and sound?
How did I come to get such a prize? I'm glad you asked.
Carrie over at Money Saving Methods introduced me to the wonders of Online Offers. By signing up for offers from various companies, many of them low cost introductory offers for products you might be interested in anyway, and then canceling the ones you don't care to keep after getting credit for them you can get amazing rewards such as gift cards, Visa cards, or even an IPod Touch plus $100 at the ITune Store! Yes, it is legit. But you have to be very organized and willing to spend a little up front for a much greater reward. In the past I've spent $200 for a $750 Visa Gift Card, about the same for a $500 KMart Gift Card, and now about $100 for the 32 GB IPod Touch and the ITunes credit (worth $500).
I encourage you to visit Carrie's site and read through all the wonderful information she provides and try out an offer. If you are careful you can reap some wonderful rewards for just a little bit upfront.
Oh, and the pattern for my knitted and felted IPod Touch Cozy can be found on Ravelry.
I'm stalking my UPS driver for my IPod Touch!
Wednesday, July 29, 2009
Kool Way to Dye!
So knitting is my latest thing, and dyeing yarn is my latest knitting thing.
First of all, if you knit you need to be on Ravelry. Unfortunately I tend to spend more time on Ravelry then I do actually knitting!
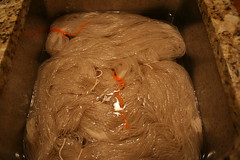
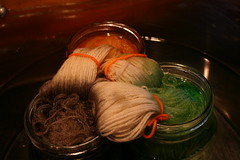
I started with this:
For future reference - the hank ended up being 5 ozs of 3 ply fingering divided into three 40 inch sections for a total of 120 inches. The end result should be self-striping yarn suitable for a pair of socks.
I used several online references for instruction on how to dye the yarn. I opted to use KoolAid for my first attempt as it was cheap and easily available - and nontoxic. Some of the references I used are: knitty.com and Streets and YOs. There are many other resources online as well.
Once I had the yarn wound all in one hank I soaked it overnight. I did add vinegar to the water, although I don't think it was necessary when using the KoolAid method of dyeing.
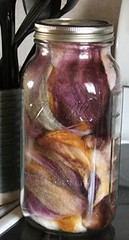
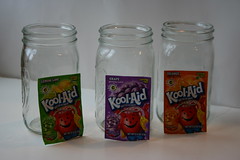
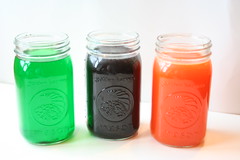
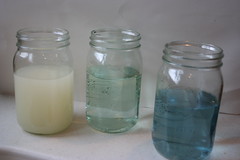
I decided on three colors: green (lime), purple (grape), and orange (orange).
I decided to use the hot water bath method. I filled a large pot about 2/3 of the way full with hot water. I then put the canning jars with the dye into the pot.
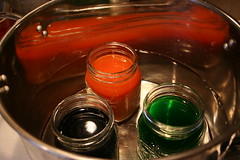
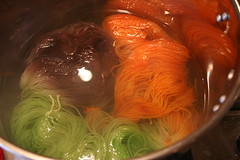
I brought the water in the pot to a boil and then simmered the pot until the water in the jars was primarily clear.
I rinsed the yarn in the water that was in the pot to avoid shocking it and risk felting.
Once the yarn cooled I drained it.
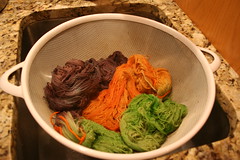 And then hung it to dry.
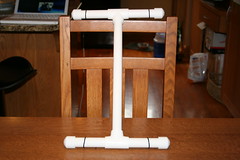
I made myself a niddy noddy so I could wind the dyed yarn into a hank solely for the purposes of photographing it. I used the directions here: Niddy Noddy Instructions and made this:
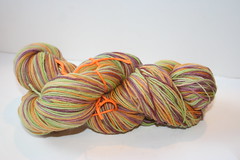
Unfortunately I removed the ties on the hank too soon and ended up with this:

But with lots and lots of patience and time I ended up with this:
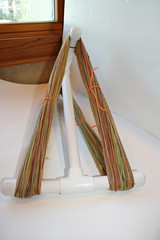
And then this:
I will definitely doing more dyeing in the future. I have on order some Jacquard Acid Dye from KnitPicks as well as the book Teach Yourself Visually Hand-Dyeing.
First of all, if you knit you need to be on Ravelry. Unfortunately I tend to spend more time on Ravelry then I do actually knitting!
I started with this:
For future reference - the hank ended up being 5 ozs of 3 ply fingering divided into three 40 inch sections for a total of 120 inches. The end result should be self-striping yarn suitable for a pair of socks.
I used several online references for instruction on how to dye the yarn. I opted to use KoolAid for my first attempt as it was cheap and easily available - and nontoxic. Some of the references I used are: knitty.com and Streets and YOs. There are many other resources online as well.
Once I had the yarn wound all in one hank I soaked it overnight. I did add vinegar to the water, although I don't think it was necessary when using the KoolAid method of dyeing.
I decided on three colors: green (lime), purple (grape), and orange (orange).
I decided to use the hot water bath method. I filled a large pot about 2/3 of the way full with hot water. I then put the canning jars with the dye into the pot.
I brought the water in the pot to a boil and then simmered the pot until the water in the jars was primarily clear.
I rinsed the yarn in the water that was in the pot to avoid shocking it and risk felting.
Once the yarn cooled I drained it.
And then hung it to dry. I made myself a niddy noddy so I could wind the dyed yarn into a hank solely for the purposes of photographing it. I used the directions here: Niddy Noddy Instructions and made this:
Unfortunately I removed the ties on the hank too soon and ended up with this:
But with lots and lots of patience and time I ended up with this:
And then this:
I will definitely doing more dyeing in the future. I have on order some Jacquard Acid Dye from KnitPicks as well as the book Teach Yourself Visually Hand-Dyeing.
Wednesday, April 15, 2009
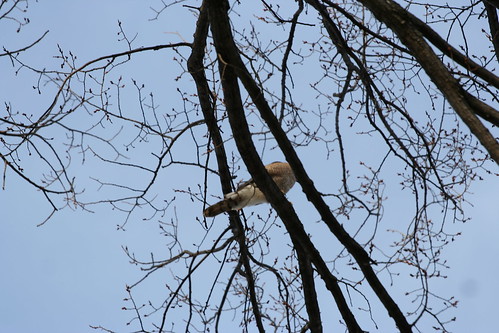
The Cooper's Hawk is back!
They're baaaaack! I got the call from my neighbor that he had seen one of our Cooper's Hawks in the tree in my front yard. Sure enough, I went out and he/she soon returned. The nest from last year was saved thanks to my request to the nice tree cutting men earlier this year. We will have to see if they return to the same nest to raise more young. How exciting!

Monday, February 2, 2009
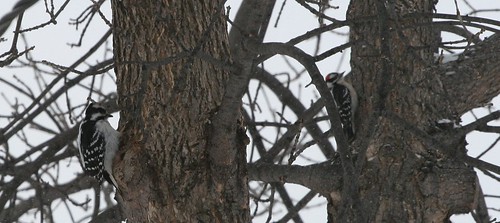
Our Resident Woodpeckers
I managed to get a picture with both of the woodpeckers that are hanging out with us this winter. The guy on the left is a Hairy Woodpecker, I believe, while the little one on the right is a Downy Woodpecker. They both spend quite a bit of time at my  feeder.
Here is a picture of the feeder. It's a very cool feeder made locally that consists of a piece of beaver wood with holes drilled in it for little rolls of suet. I bought it my local bird feed store, Critters Feed & Seed, in Moorhead, MN. The people who own this little store are very nice and are always happy to talk birding. You can't really say that about your local big box store so I buy my seed there whenever I can. They also have better quality seed and will reuse the seed bags if I bring them back. If you live in the Fargo/Moorhead area I suggest you try them out.
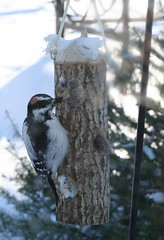
feeder.Here is a picture of the feeder. It's a very cool feeder made locally that consists of a piece of beaver wood with holes drilled in it for little rolls of suet. I bought it my local bird feed store, Critters Feed & Seed, in Moorhead, MN. The people who own this little store are very nice and are always happy to talk birding. You can't really say that about your local big box store so I buy my seed there whenever I can. They also have better quality seed and will reuse the seed bags if I bring them back. If you live in the Fargo/Moorhead area I suggest you try them out.
Blogged with the Flock Browser
Saturday, January 31, 2009
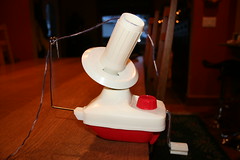
My New Toy!
Okay, so this would definitely be a "want" not a "need," but it is very cool.
Yarn Ball Winder:

When I started knitting about a year ago I started with dishcloths using
Lily Sugar N Cream cotton yarn. Those dishcloths are still going strong!
I then discovered the Ravelry website and got totally hooked on knitting. I'll post another time about Ravelry.
Since then I have started accumulating a small stash of yarn. I would never have thought I needed to do anything to the skeins of yarn I buy from Michael's or Jo-Ann Fabrics, and really I don't. But if (or shall I say when) I branch out to buying yarns from independent yarn stores they will come in hanks, which will need to be wound into balls before they can be used.
I found this on Jo-Ann.com, and after using an online coupon it was just over $20. I had to buy some yarn for a project that required more than I had bought originally (of course I couldn't find any more locally) but I also signed up for an account and got a coupon for $2.95 shipping, so it wasn't too bad.
This winder has gotten mixed reviews, but I think mainly the problem was with people not realizing that you have to pull the side yarn guide all the way out until it clicks. I've had no problem with it so far, and it is tons of fun to do. Even my 11-year-old son has fund winding the balls, although he got a little too enthused and pulled the thing off the table!
So here is what you start with, what it looks like in progress, and the finished product!
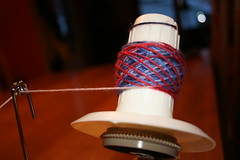
And here is just a little bit of my stash looking all rolled up and cute:

If you are interested in buying the yarn winder there is a link to one sold on Amazon to the right of this post. But be careful, winding yarn can be addicting!
Yarn Ball Winder:
When I started knitting about a year ago I started with dishcloths using
Lily Sugar N Cream cotton yarn. Those dishcloths are still going strong!
I then discovered the Ravelry website and got totally hooked on knitting. I'll post another time about Ravelry.
Since then I have started accumulating a small stash of yarn. I would never have thought I needed to do anything to the skeins of yarn I buy from Michael's or Jo-Ann Fabrics, and really I don't. But if (or shall I say when) I branch out to buying yarns from independent yarn stores they will come in hanks, which will need to be wound into balls before they can be used.
I found this on Jo-Ann.com, and after using an online coupon it was just over $20. I had to buy some yarn for a project that required more than I had bought originally (of course I couldn't find any more locally) but I also signed up for an account and got a coupon for $2.95 shipping, so it wasn't too bad.
This winder has gotten mixed reviews, but I think mainly the problem was with people not realizing that you have to pull the side yarn guide all the way out until it clicks. I've had no problem with it so far, and it is tons of fun to do. Even my 11-year-old son has fund winding the balls, although he got a little too enthused and pulled the thing off the table!
So here is what you start with, what it looks like in progress, and the finished product!
And here is just a little bit of my stash looking all rolled up and cute:
If you are interested in buying the yarn winder there is a link to one sold on Amazon to the right of this post. But be careful, winding yarn can be addicting!
Subscribe to:
Posts (Atom)